AZ Visual Memories
Oct 5, 2016
Sep 24, 2016
Top Tips: Rim lighting in Portraits
Before I start I'd like to apologize for not posting in so long. The past few weeks have been pretty busy for me and I've been struggling to decide what to write next. Turns out, this is what I decided on, so let's get right into it!
There are lot's of ways you can use rim lighting. You can make silhouettes, or light the face to keep the detail. You can have a dark theme, or a light theme. It all depends on what you want to do and what fits your personal style.
But I'm not just gonna talk about what rim lighting is--I'm guessing you're reading this because you're interested in doing it yourself, am I right?
Okey, so let's learn how!
Tip One: Light your subject from behind
As I said earlier, the light coming from behind your subject (in this case my little sister) is the light that creates your rim light. I put a light right behind her head to create this effect. For a more subtle effect you can also place the light further back or to one side (and out of the frame obviously...unless you want it in the frame, which sometimes can create an interesting effect if done correctly)
Tip Two: Use a second light
Unless you're looking to create a silhouette, having a second light source is not optional. There's no way to light the front of the face unless you have another light source. In my case, the second light source was an umbrella light. I used an umbrella with a reflective silver surface on the inside and a matte, black surface on the outside. This let me turn the umbrella to direct the light where I wanted it to go because the light could not go through the umbrella as well as if it were, say, a white diffusion material.
If you absolutely have no extra light to use, a reflect could also work. You could reflect some light from the back-light onto the face to bring in more detail there and that could totally work too.
Tip Three: Bring up the contrast
Contrast is your friend when you're dealing with rim lighting. It brings out the back-light and shadows to create the dramatic rim-lit effect. Don't go too overboard though; too much of a good thing can be disastrous.
Well that's it for this post. I hope you learned a little something! Now it's your turn to go out there and make your own amazing rim lighting effects in your portraits. (or anything else you want to try rim lighting for that matter!) And if you found this helpful, don't forget to subscribe so you wont miss any future posts!
Aug 28, 2016
Photo-manipulation Tutorial
What You'll Need:
- Pier Photo (click for link)
- Galaxy Photo (click for link)
- Photoshop
- Green-screen (optional)
How To:
- First you'll need to set up your green-screen. If you don't have a green-screen, that's totally fine. You will just need to do a bit more work in post-processing.
- Take several shots of your model so you have some choices to pick from.
- Open your chosen image in Photoshop and delete the green-screen to leave your model on a transparent background. If you didn't use a green-screen, you will still delete the background, you will simply need to do a bit more work as you wont have big chunks of green that you can easily erase.
- Open the pier photo that was linked in the list above and paste your model onto it as a separate layer.
- From here you just need to make sure that the coloring of your model fits the color of the pier background. You can do this by selecting the layer with your model and using hue/saturation and photo filters to correct the color so that it fits together with the other image.
- Add a simple shadow on the pier using the burn tool so that it ancors your model into the shot, making it more realistic.
- Now you can get creative in what kinds of elements you want. I added blue dots with lens flare to create magical orbs floating around in the air. I also added a glow around the model, a lens flare, and glowing light in the hands to show a kind of energy source being used from inside the model.
- Next you will open the galaxy photo and paste it over what you have so far. Change the blending mode to screen and adjust it to fit your liking.
- Adjust the coloring, brightness, and contrast to bring it all together, add any extra elements you want, and you're done!
(Sorry about the video quality, it was not that bad when I made it, but blogger kinda ruined it.)
Like what you're reading? Subscribe to my blog and never miss a post!
Like what you're reading? Subscribe to my blog and never miss a post!
Aug 22, 2016
Lightdow RF-550D LED Ring Flash Review
This Product can be found on Amazon for $35.35.
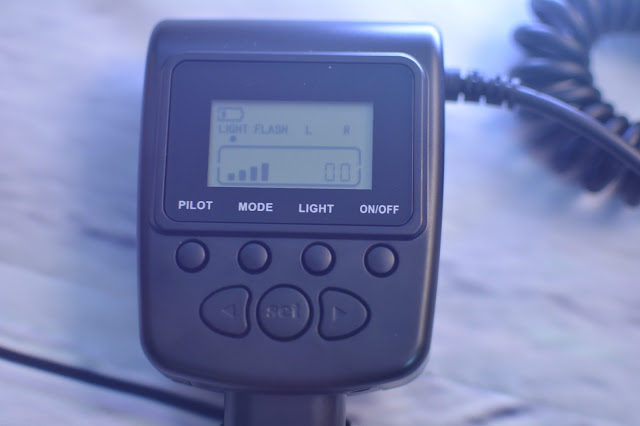
This is the 'control center' for the light. The on/off button needs to be held for it to turn on and off. (This took me a little while to figure out and I thought I had received a faulty product at first.)
The buttons are however a little slow at responding at times, but I haven't found this to be too much of a problem for me as they do respond most of the time.
Let's go over what all these buttons do.
- The 'pilot' button basically is like the test button. It sets the flash off without making you hit the shutter on your camera, allowing you to test brightness and whatever settings you need to test before you take the shot.
- Mode, as you may guess, switches the mode. Not from flash to continuous, but from left, right, and full flashes. You can use this button to make the flash only fire on one side of the circle. (this does not work in continuous lighting mode)
- Light switches the light from 'flash' and 'light' (light is just what they use for continuous lighting or basically having the light on all the time.)
- I bet you'll never guess what the on/off button does. Oh what's that? You already know? Yup. It turns this little machine on and off.
- Now those little arrows under the buttons we just went over are what control the intensity of your light. On the screen you can see the lighting meter and when you hit those buttons it changes the exposure compensation so you can manually set the brightness to fit your lighting situation.
Well that's all the buttons, so now that you know what everything does, let's check the performance.
Here's a list of all the pros and cons that I've found using this light:
Pros
- Super bright
- Plenty of settings to adjust to your needs
- Ease of use
- Comes with three 'gel' colors to switch up the colors. (blue, yellow, and a white diffusion filter)
- Comes with lots of adapter rings so it can fit on any lens no matter what the thread is
- Allows for flashing light on only one half of your image
- Not too heavy
- Bright display screen for settings
Cons
- Slow responsive buttons
- The 'Set' button seems to have no use
- Battery cover feels cheap and is hard to close/open
- Flash went off late once (although it hasn't happened again so I think it's okay now.)
And Here are some pictures taken using this light.
Overall, this is a great flash and I'm loving it. If you're looking for something like this, I highly suggest checking this one out.
Aug 15, 2016
Dramatic Lighting
Dramatic lighting is a style of lighting that creates dramatic shadows and often works with the main light coming from only one side of the photo.
For this project I will be using a black backdrop and two lights.
So let's get started!
One-Point Lighting
We'll start with a one-point lighting setup.
It should be slightly in front of your subject, not behind.
Right:
(light is abut 2 feet in front of subject)
Wrong:
(light is behind subject)
Because there is only light coming from one side, you will want your model's face tilted slightly toward the light (or completely facing it); this allows the light to brighten the face and bring out details, while facing away from the light will cause detail to be lost from the face.
Two-Point Lighting
This setup leaves the main light where it was, but adds one more light coming right under the main one. Although the one-point lighting setup does work well, if you notice there are some shadows on the face under the eyes, neck, and nose that I would like to lessen. If you position a second light very low to the ground and pointing up toward your model's face, it should add enough fill light to soften those shadows a bit.
Without 2nd light
With 2nd Light
Aug 7, 2016
Natural Light
Natural light is pretty easy to work with when it comes to most any kind of photography. It offers you bright, beautiful light that often lights your subject pretty evenly. Cloudy days emit a more defused light, while clear, sunny days have a bit harsher light.
I'm sure you've heard of what I'm about to mention next. Yup, you guessed it: the golden hour. I've mentioned this subject before on this blog so I won't take much time on it, but basically the golden hour is the hour before the sun sets and after it rises. (when the sun is lowest in the sky) This time of day offers the most flattering light for photography as it gives soft, warm lighting.
There is also something called 'the blue hour' which is the short period of time before the sun rises and after it sets. The light you get during this time is cooler, as can be expected.
Now natural light is uncontrollable, right? I mean, how can you change how the sun is shining on you? Or if there are clouds in the sky? Well, you can't change those things, but you can control the light to create the image you desire. A few examples of how you can use natural light with some more control are using a window to direct the light, reflectors to bounce it, changing your position according to the sun to move it, and using thin white curtains over a window to diffuse it.
Aug 1, 2016
Subscribe to:
Comments (Atom)


